





One of the first skills every beginner wants to master is sewing a perfectly straight line. While it may sound simple, keeping your stitching neat and even can be surprisingly challenging when you’re just starting out.
The good news is that sewing straight isn’t about having a steady hand – it’s about using the right techniques and letting your sewing machine do the hard work.
In this guide, we’ll share practical tips to help you sew straighter seams, improve your confidence and achieve professional-looking results every time.
Why Sewing Straight Lines Matters
Straight stitching is the foundation of almost every sewing project.
Whether you’re making clothes, quilts, curtains or cushion covers, straight seams help ensure:
- Neater finished projects
- Accurate seam allowances
- Better-fitting garments
- Easier assembly
- A more professional appearance
Fortunately, it’s a skill that improves quickly with a little practice.
1. Don’t Watch the Needle
This is the biggest mistake beginners make.
It seems natural to stare at the needle, but doing so actually makes it harder to sew straight.
Instead, focus your eyes 5-10cm (2-4 inches) ahead of the needle and watch the edge of the fabric as it follows your chosen seam guide.
Your hands will naturally keep the fabric aligned.
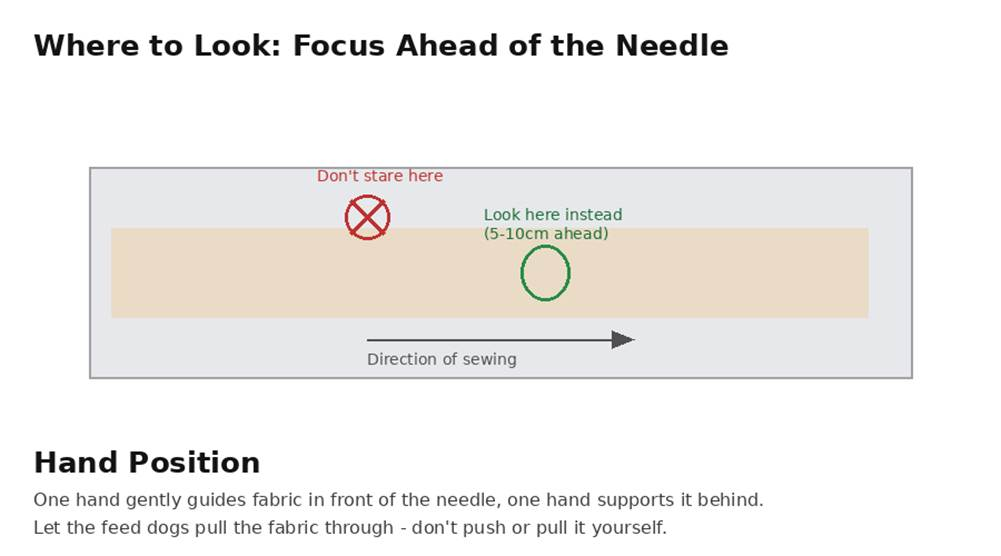
Focus on the fabric edge ahead of the needle, not the needle itself.
2. Use Your Machine’s Seam Guides
Most sewing machines have seam allowance markings engraved on the needle plate.
These lines help you maintain an even distance from the edge of the fabric.
Common seam allowances include:
- 6mm (1/4 inch)
- 10mm (3/8 inch)
- 15mm (5/8 inch)
- 20mm (3/4 inch)
Simply keep the edge of your fabric aligned with the correct guide throughout the seam.
No visible markings? Your presser foot can double as a guide too – on many machines, the inside edge of the standard foot sits roughly 1/4″ (6mm) from the needle, and the outside edge roughly 3/8″ (10mm). Check your machine’s manual to confirm the exact measurement for your model.
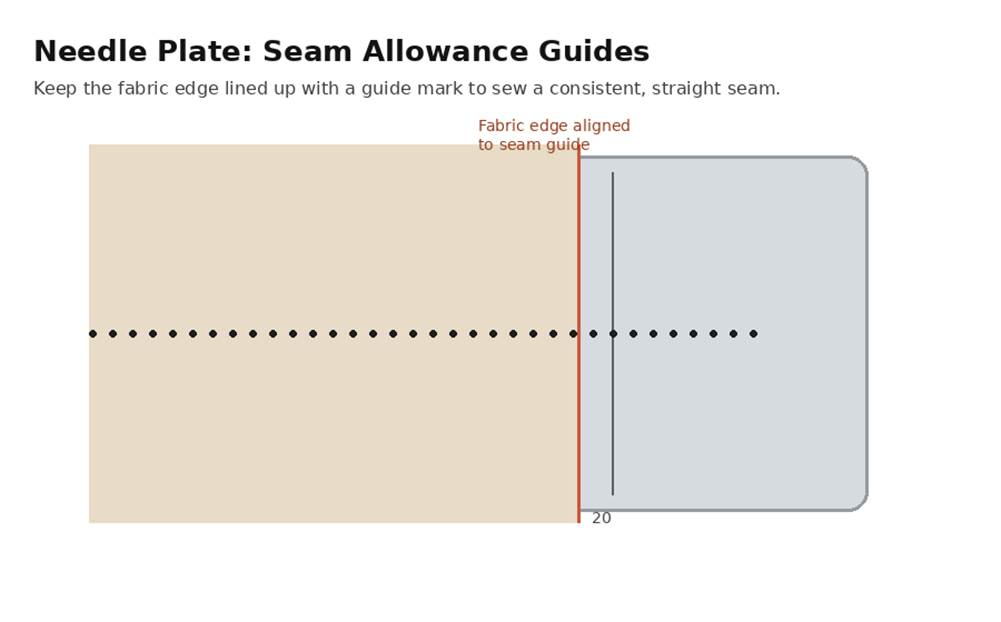
Seam allowance guides marked on the needle plate.
3. Create a Physical Seam Guide
If your sewing machine’s markings aren’t easy to see, create your own guide.
You can use:
- Low-tack painter’s tape
- Washi tape
- Magnetic seam guides (if compatible with your machine)
- A stack of sticky notes
These provide a raised edge that helps keep the fabric perfectly aligned.
4. Fit a Straight-Stitch Needle Plate
Many sewing machines can also take a straight-stitch (single-hole) needle plate as an accessory. Unlike the standard plate, which has a wide slot for zigzag stitching, this plate has just a small round hole for the needle.
This stops lightweight or delicate fabric from being pulled down into the machine as you sew, which is a common cause of skewed or puckered straight seams – especially useful for piecing quilts or sewing fine fabrics.
Shop tip
Ask us about straight-stitch plates compatible with your sewing machine model – a simple accessory that makes a noticeable difference on fine fabrics.
5. Try a Specialty Presser Foot
Beyond the standard foot, a few specialty presser feet are designed specifically to help you sew straighter:
- Quarter-inch (patchwork) foot – has a short metal guide or edge to keep a precise 1/4″ seam, popular with quilters
- Edge-stitch foot – has a small guide blade that rides along a folded edge or seam, ideal for topstitching
- Adjustable guide foot – lets you set and lock the seam width you want
These are inexpensive accessories that can make a noticeable difference, especially for quilting or topstitching projects.
6. Adjust Your Needle Position if Your Machine Allows It
Many sewing machines let you shift the needle left or right while keeping a straight stitch. If your seam allowance needs to be a touch narrower or wider than your nearest guide mark, nudge the needle position rather than trying to eyeball a gap between the fabric edge and the guide.
This is particularly handy for a “scant” quarter-inch seam, which is common in quilting.
7. Let the Feed Dogs Do the Work
Your sewing machine has feed dogs underneath the presser foot that move the fabric through the machine.
Avoid pulling or pushing the fabric.
Instead:
- Guide it gently.
- Keep your hands relaxed.
- Let the machine control the speed and feeding.
Pulling the fabric can result in uneven stitches or even bent needles.
8. Sew in Short Bursts, Not One Continuous Line
On longer seams, it’s tempting to sew in one continuous motion from start to finish – but this often forces you to slide your hands down the fabric as it feeds through, which can pull your stitching off track.
Instead, sew a short segment, stop with the needle down (most machines let you leave the needle in the fabric), lift the presser foot slightly if needed, reposition your hands, then continue.
This is especially useful on large or heavy projects like curtains, quilts or canvas work, where full control over the fabric matters most.
9. Check Your Tension Before You Start
Uneven top tension can make even a perfectly straight seam look messy, puckered, or loose on one side.
Before starting your project, test your stitch on a scrap of the same fabric. If the stitches look loose, tight, or puckered, adjust your top tension dial a little at a time until the stitch looks even on both sides of the fabric.
10. Secure Your Threads at the Start
A common beginner issue is thread bunching or “birds nesting” underneath the fabric at the start of a seam.
To prevent this, hold the top and bobbin threads gently behind the presser foot for the first few stitches before letting go.
11. Slow Down
Many beginners try to sew too quickly.
Reducing your speed gives you more control, especially when learning.
If your machine has a speed control slider, set it to a slower setting until you feel more confident.
Remember, accuracy is far more important than speed.
12. Sit in the Correct Position
Good posture can make a surprising difference.
Try to:
- Sit directly in front of the needle.
- Keep both feet comfortably on the floor (or one on the foot pedal).
- Ensure your shoulders are relaxed.
- Position your machine on a stable table.
Being properly aligned with your sewing machine makes it much easier to guide fabric accurately.
13. Practise Without Thread
Here’s a great exercise for beginners.
Remove the thread from your machine and sew along printed lines on paper.
This helps you learn how to guide the machine without worrying about stitches or wasting fabric.
You can download printable sewing practice sheets or simply draw your own straight, curved and zigzag lines.
14. Mark Your Stitching Lines
If precision is important, don’t rely on guesswork.
Use:
- Tailor’s chalk
- Water-soluble fabric pens
- Heat-erasable fabric pens
- Fabric pencils
Drawing a guideline before sewing makes it much easier to stay on course.
15. Use Both Hands
Keep one hand in front of the needle and one behind it.
Your hands should gently guide the fabric rather than gripping it tightly.
Think of your hands as steering the fabric, not forcing it through the machine.
16. Press Fabric Before Sewing
Wrinkled fabric makes straight sewing much more difficult.
Always press your fabric before cutting and sewing.
Flat fabric feeds through the machine more evenly and results in straighter seams.
17. Pin or Clip Carefully
Holding fabric layers together prevents them from shifting.
Pins should be placed perpendicular to the seam whenever possible.
Alternatively, sewing clips are excellent for thicker fabrics or materials that shouldn’t be pinned, such as leather or vinyl.
Remove pins before the needle reaches them to avoid damaging the needle or machine.
18. Keep Your Needle Sharp
A worn or bent needle can affect stitch quality and fabric feeding.
Replace your sewing machine needle every 8-10 hours of sewing or at the start of a major project.
Using the correct needle type for your fabric also makes a noticeable difference.
19. Practise Different Fabrics
Every fabric behaves differently.
Try practising on:
- Cotton
- Linen
- Denim
- Jersey
- Canvas
The more fabrics you work with, the better you’ll understand how they feed through your machine.
20. Sew Consistently
Like any skill, straight stitching improves with practice.
Try spending just 10-15 minutes each week practising:
- Straight lines
- Corners
- Curves
- Pivoting
- Even seam allowances
You’ll be amazed how quickly your confidence grows.
Common Reasons Your Stitching Isn’t Straight
If you’re struggling to sew straight lines, one of these issues could be the cause. Use the table below to quickly find the fix:
| Problem | Fix |
| Watching the needle instead of the fabric edge | Shift your focus 5-10cm ahead, on the seam guide |
| Sewing too quickly | Slow down or use your machine’s speed control slider |
| Pulling or pushing the fabric | Let the feed dogs do the work; guide gently with both hands |
| Wrinkled or unpressed fabric | Press fabric flat before cutting and sewing |
| Worn or bent needle | Replace the needle every 8-10 hours of sewing |
| Poor posture or machine position | Sit directly in front of the needle, machine on a stable table |
| Not following the seam guide | Keep the fabric edge aligned with the marked guide the whole seam |
| Loose or tight top tension | Test stitch on scrap fabric first; adjust tension dial until even |
| Poor lighting | Use a task lamp so you can clearly see the guide and fabric edge |
| Sliding your hands as you sew a long seam | Stop with the needle down every few inches, reposition your hands, then continue |
A Simple Practice Exercise
Try this easy exercise to improve your control:
- Draw five straight lines on a piece of paper.
- Remove the thread from your machine.
- Sew directly over each line.
- Repeat until you can consistently stay on the line.
- Repeat the exercise using fabric.
This simple routine helps build confidence without worrying about wasting thread or fabric.
Final Thoughts
Learning to sew straight lines isn’t about natural talent – it’s about good habits and consistent practice.
By focusing on the fabric edge, using your sewing machine’s seam guides, checking your tension, slowing down and letting the feed dogs do their job, you’ll quickly notice a significant improvement in your stitching.
Don’t be discouraged if your first few seams aren’t perfect. Every experienced sewist started exactly where you are. With a little patience and regular practice, sewing straight lines will soon become second nature, allowing you to tackle more ambitious projects with confidence.
| New to sewing? Browse our range of beginner-friendly sewing machines, or get in touch at info@gursewingmachines.com if you’d like advice on choosing the right accessories – straight-stitch plates, quarter-inch or edge-stitch feet, seam guides or extension tables – for your machine. |
Frequently Asked Questions
Why can’t I sew a straight line?
Most beginners focus on the needle rather than the fabric edge. Watching your seam guide and slowing down usually leads to much straighter stitching.
Should I pin fabric before sewing?
Yes. Pins or sewing clips help keep fabric layers aligned and prevent them from shifting while you sew.
What’s the easiest fabric to practise on?
Medium-weight cotton is ideal for beginners because it’s stable, easy to handle and feeds smoothly through most sewing machines.
Can I practise sewing without thread?
Absolutely. Sewing along printed lines on paper without thread is a great way to improve your control and build confidence before moving on to fabric.
Why does my stitching look puckered even though it’s straight?
This is usually a tension issue rather than a straightness issue. Test your stitch on scrap fabric and adjust the top tension dial until the stitches sit evenly on both sides.